How to Remove PC Antivirus Pro Rogue Anti-Spyware?
PC Antivirus Pro Information:
PC Antivirus Pro (or PCAntivirusPro) is a rogue security program that takes advantage of your system vulnerabilities to infiltrate it and commit some unwanted actions in there. Once installed, PC Antivirus Pro configures the system to launch it each time Windows starts. When running, PC Antivirus Pro will imitate a system scan and report a variety of malware infections on your computer such as adware, spyware and Trojans. Then PC Antivirus Pro suggest you purchase the “full” PC Antivirus Pro version for removing “detected” threats. In fact, what PC Antivirus Pro reports is not true. The biggest problem is PC Antivirus Pro itself. If you find that your computer is infected with PC Antivirus Pro, please use the removal instructions below to remove PC Antivirus Pro from your PC either manually or with an automatic removal tool.
Manual Removal
Note: If you are not proficient with computer, it’s suggested that you backup your registry before manually removing PC Antivirus Pro Rogue Anti-Spyware. And double check the entries that you are going to delete, or your computer can’t work for missing some files.
Step 1: End its process by opening Task Manager.
av.exe
ave.exe
Step 2: The registry entries you need to delete:
HKEY_CURRENT_USERSoftwareClasses.exeshellopencommand “(Default)” = “%UserProfile%Local SettingsApplication Dataav.exe” /START “%1″ %*
HKEY_CURRENT_USERSoftwareClassessecfileshellopencommand “(Default)” = “%UserProfile%Local SettingsApplication Dataav.exe” /START “%1″ %*
HKEY_CLASSES_ROOT.exeshellopencommand “(Default)” = “%UserProfile%Local SettingsApplication Dataav.exe” /START “%1″ %*
HKEY_CLASSES_ROOTsecfileshellopencommand “(Default)” = “%UserProfile%Local SettingsApplication Dataav.exe” /START “%1″ %*
HKEY_LOCAL_MACHINESOFTWAREClientsStartMenuInternetFIREFOX.EXEshellopencommand “(Default)” = “%UserProfile%Local SettingsApplication Dataav.exe” /START “C:Program FilesMozilla Firefoxfirefox.exe”
HKEY_LOCAL_MACHINESOFTWAREClientsStartMenuInternetFIREFOX.EXEshellsafemodecommand “(Default)” = “%UserProfile%Local SettingsApplication Dataav.exe” /START “C:Program FilesMozilla Firefoxfirefox.exe” -safe-mode
HKEY_LOCAL_MACHINESOFTWAREClientsStartMenuInternetIEXPLORE.EXEshellopencommand “(Default)” = “%UserProfile%Local SettingsApplication Dataav.exe” /START “C:Program FilesInternet Exploreriexplore.exe”
HKEY_CURRENT_USERSoftwareClasses.exeshellopencommand “(Default)” = “%UserProfile%Local SettingsApplication Dataave.exe” /START “%1″ %*
HKEY_CURRENT_USERSoftwareClassessecfileshellopencommand “(Default)” = “%UserProfile%Local SettingsApplication Dataave.exe” /START “%1″ %*
HKEY_CLASSES_ROOT.exeshellopencommand “(Default)” = “%UserProfile%Local SettingsApplication Dataave.exe” /START “%1″ %*
HKEY_CLASSES_ROOTsecfileshellopencommand “(Default)” = “%UserProfile%Local SettingsApplication Dataave.exe” /START “%1″ %*
HKEY_LOCAL_MACHINESOFTWAREClientsStartMenuInternetFIREFOX.EXEshellopencommand “(Default)” = “%UserProfile%Local SettingsApplication Dataave.exe” /START “C:Program FilesMozilla Firefoxfirefox.exe”
HKEY_LOCAL_MACHINESOFTWAREClientsStartMenuInternetFIREFOX.EXEshellsafemodecommand “(Default)” = “%UserProfile%Local SettingsApplication Dataave.exe” /START “C:Program FilesMozilla Firefoxfirefox.exe” -safe-mode
HKEY_LOCAL_MACHINESOFTWAREClientsStartMenuInternetIEXPLORE.EXEshellopencommand “(Default)” = “%UserProfile%Local SettingsApplication Dataave.exe” /START “C:Program FilesInternet Exploreriexplore.exe”
HKEY_LOCAL_MACHINESOFTWAREMicrosoftSecurity Center “AntiVirusOverride” = “1”
HKEY_LOCAL_MACHINESOFTWAREMicrosoftSecurity Center “FirewallOverride” = “1”
Step 3: Files you need to delete:
av.exe
ave.exe
Please, be aware that manual removal of PC Antivirus Pro Rogue Anti-Spyware is a cumbersome task and can not always ensure complete removal of the malware, due to the fact that some files might be hidden or may get reanimated automatically afterwards.Moreover, lack of the required skills and even the slightest deviation from the instructions may lead to irreparable system damage. That’s why it’s strongly recommended automatic removal of PC Antivirus Pro Rogue Anti-Spyware, which will save your time and enable avoiding any system malfunctions and guarantee the needed result.
Automatic PC Antivirus Pro Rogue Anti-Spyware Removal:
1. Restart your computer and keep pressing F8 Key before Windows launches. Use the arrow keys to select the “Safe Mode with Networking” option, and then hit ENTER Key to continue.
2. Download Spyware Cease (Spyware Cease review), install it and update its database to the latest. After that, restart your computer so as to make Spyware Cease fully functional. Repeat Step 1 into Safe Mode and run an Online Scan of your computer so that Spyware Cease can detect all potential malware in your system.
NOTE: If you have problem installing Spyware Cease, you can download this correction script, unzip it and then double click to run it. It will correct your registry settings that the virus has modified. Then double click the program and finish the installation.
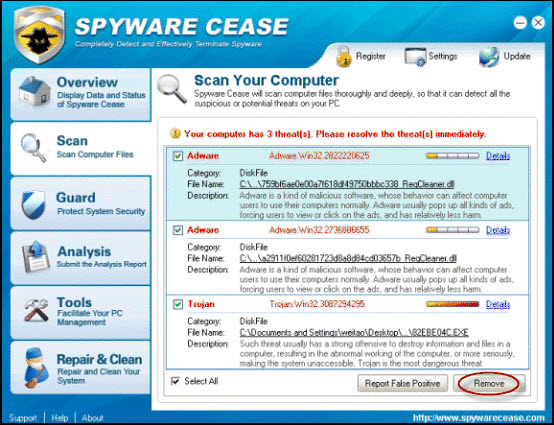

3. After the Online Scan finishes, click “Details” for the malware detected to make sure that your important data are not infected and removed. Ignore or select the scan result and click “Remove” to remove the threats. Reboot your computer and let Spyware Cease delete all detected virus.
4. Click to repair your corrupted registry
Why should you need to repair the registry?
As we all know, virus and Trojans modify and destroy system registry and make the computer malfunction so that the computer will not perform normally. Even if the virus and Trojans are removed, the registry is still destroyed or modified, so the computer still has problems. That’s the very reason why you need to repair the registry. At the meanwhile, some virus and Trojans leave some DLL files in the registry and this will cause strange DLL errors and affect the computer performance.
To make your computer run as perfectly as before or much faster than before:
1. Download and install Multi-Awarded Registry Tool.
2. Run a full scan of your registry.
3. Click “Repair Problems” and repair all errors detected.
After these 3 easy steps, your computer will run much faster than before within minutes!

Related posts: