How to Remove Customwebblacklist.com Hijacker?
Customwebblacklist.com Hijacker Information:
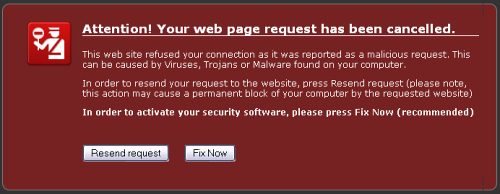
Customwebblacklist.com (or Customwebblacklist.net) is a malicious website promoting a rogue anti-spyware application known as Antivirus 7. In case you got forcibly browser redirects to Customwebblacklist.com is that your has been infected by Antivirus 7 which is trying to scam you out of some money. Antivirus 7 infiltrates your computer thru the help of Trojans. Once active, Antivirus 7 quickly modifies some settings including the browser configuration. Your Internet activity will be therefore paralyzed due to the obsessive interference of Antivirus 7. When you are trying to go online, you will be blocked by a fake warning reading “Attention! Your web page request has been cancelled”. When you click on this waring, scan results and pop-ups generated by Antivirus 7, you will be redirected to Customwebblacklist.com and pushed to purchase Antivirus 7. Do not fall for this trickery. Please see below for more instructions to remove Antivirus 7 and get rid of Customwebblacklist.com virus or its relative offensive objects on your system.
Customwebblacklist.com Hijacker Screenshot:
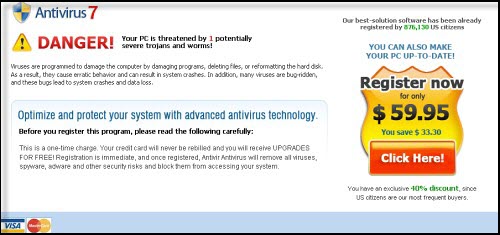
Customwebblacklist.com Payment Processing Page Screenshot 1:
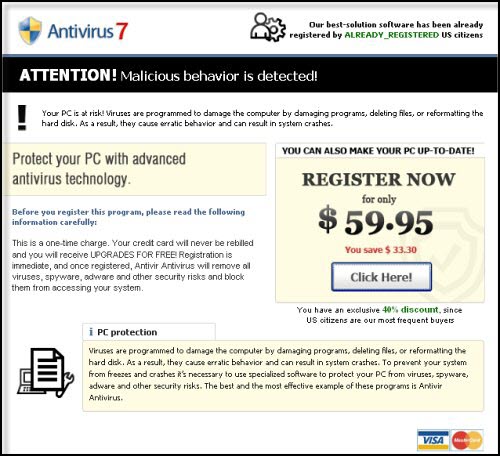
Customwebblacklist.com Payment Processing Page Screenshot 2:
Manual Removal
Note: If you are not proficient with computer, it’s suggested that you backup your registry before manually removing Customwebblacklist.com Virus. And double check the entries that you are going to delete, or your computer can’t work for missing some files. In case you can’t surf the Internet, open Internet Explorer, go to “Tools”, choose “Internet options” and hit “Connections” tab. Click “LAN settings” and untick the option “Use a proxy server for your LAN”. Save all these changes. Now, you will be able to go to our website and download our removal tool to have Antivirus 7 virus expelled for good.
Step 1: End its process by opening Task Manager.
%Program Files%\Antivirus7AV\unins000.exe
%Program Files%\Antivirus7AV\Antivirus7.exe
%Program Files%\AV\Antivirus7.exe
Step 2: The files you need to delete:
HKEY_LOCAL_MACHINE\SOFTWARE\Microsoft\Windows\CurrentVersion\Uninstall\{6A23338A-C725-48D0-BA96-B12FDD22DD39}_is1
HKEY_CURRENT_USER\Software\FNULL246
HKEY_LOCAL_MACHINE\SOFTWARE\Microsoft\Windows\CurrentVersion\Internet Settings\5.0\User Agent\post platform “WinNT-EVI 25.11.2009″
HKEY_CURRENT_USER\Software\Microsoft\Windows\CurrentVersion\Run “Antivirus7″
HKEY_LOCAL_MACHINE\SOFTWARE\Microsoft\Windows\CurrentVersion\Explorer\Browser Helper Objects\{35A5B43B-CB8A-49CA-A9F4-D3B308D2E3CC}
HKEY_CLASSES_ROOT\CLSID\{35A5B43B-CB8A-49CA-A9F4-D3B308D2E3CC}
HKEY_CURRENT_USER\Software\EVAACD
Step 3: The DLL files you need to unregister:
%WINDOWS%\system32\UpdateCheck.dll
Step 4: The files you need to delete:
%WINDOWS%\system32\UpdateCheck.dll
%Program Files%\Antivirus7AV\unins000.exe
%Program Files%\Antivirus7AV\unins000.dat
%Program Files%\Antivirus7AV\Antivirus7.exe
%Program Files%\Antivirus7AV
%Program Files%\Common Files\Uninstall\AV\Uninstall.lnk
%Program Files%\Common Files\Uninstall\AV
%Program Files%\Common Files\Uninstall
%Program Files%\AV\Antivirus7.exe
%Program Files%\AV
%Documents and Settings%\[UserName]\Desktop\Antivirus7.lnk
%Documents and Settings%\All Users\Start Menu\AV\Uninstall.lnk
%Documents and Settings%\All Users\Start Menu\AV\Antivirus7.lnk
%Documents and Settings%\All Users\Start Menu\AV
Please, be aware that manual removal of Customwebblacklist.com Virus is a cumbersome task and can not always ensure complete removal of the malware, due to the fact that some files might be hidden or may get reanimated automatically afterwards. Moreover, lack of the required skills and even the slightest deviation from the instructions may lead to irreparable system damage. That’s why it’s strongly recommended automatic removal of Customwebblacklist.com Virus, which will save your time and enable avoiding any system malfunctions and guarantee the needed result.
Automatic Customwebblacklist.com Virus Removal:
1. Restart your computer and keep pressing F8 Key before Windows launches. Use the arrow keys to select the “Safe Mode with Networking” option, and then hit ENTER Key to continue.
2. Download Spyware Cease (Spyware Cease review), install it and update its database to the latest. After that, restart your computer so as to make Spyware Cease fully functional. Repeat Step 1 into Safe Mode and run an Online Scan of your computer so that Spyware Cease can detect all potential malware in your system.
NOTE: If you have problem installing Spyware Cease, you can download this correction script, unzip it and then double click to run it. It will correct your registry settings that the virus has modified. Then double click the program and finish the installation.
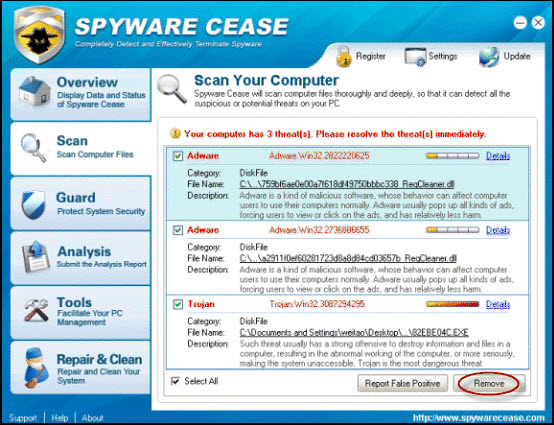

3. After the Online Scan finishes, click “Details” for the malware detected to make sure that your important data are not infected and removed. Ignore or select the scan result and click “Remove” to remove the threats. Reboot your computer and let Spyware Cease delete all detected virus.
4. Click to repair your corrupted registry
Why should you need to repair the registry?
As we all know, virus and Trojans modify and destroy system registry and make the computer malfunction so that the computer will not perform normally. Even if the virus and Trojans are removed, the registry is still destroyed or modified, so the computer still has problems. That’s the very reason why you need to repair the registry. At the meanwhile, some virus and Trojans leave some DLL files in the registry and this will cause strange DLL errors and affect the computer performance.
To make your computer run as perfectly as before or much faster than before:
1. Download and install Multi-Awarded Registry Tool.
2. Run a full scan of your registry.
3. Click “Repair Problems” and repair all errors detected.
After these 3 easy steps, your computer will run much faster than before within minutes!

Related posts: