How to Remove System Pro 2011 Rogue Anti-Spyware?
# This article How to Remove System Pro 2011 Virus is an article in Spyware Removal Instructions, the original author is Security-Wire.com .You can read more information in the following:
System Pro 2011 Information:
System Pro 2011 (also referred as SystemPro 2011) is a rogue software that originates from the same rogue family as Win7 AV. Besides similar User Interface, they also implement the same behavior patterns and deceptive tactics. System Pro 2011 stealthily comes into your machine via Trojans which open backdoors and drag in its corrupt components. The trial version of System Pro 2011 begins to examine your computer for viruses and somehow displays many harmful malware. Moreover, it pops up loads of bogus alerts denoting “potential virus”. Actually, those malware do not really reside in your computer, but they are made up or just some legitimate system or application files. System Pro 2011 tries to trick you with fabricated malware infections and then coaxes you into purchasing its full version to resolve your PC security problems. Don’t fall for its trap! System Pro 2011 has no capability to detect or remove any malware. For your convenience, the complete removal procedures for you to remove System Pro 2011 is clearly stated below.
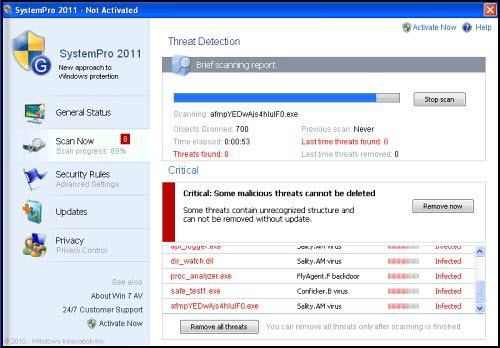
System Pro 2011 Screenshot:
Manual Removal
Note: If you are not proficient with computer, it’s suggested that you backup your registry before manually removing System Pro 2011 Virus. And double check the entries that you are going to delete, or your computer can’t work for missing some files. In case you can’t surf the Internet, open Internet Explorer, go to “Tools”, choose “Internet options” and hit “Connections” tab. Click “LAN settings” and untick the option “Use a proxy server for your LAN”. Save all these changes. Now, you will be able to go to our website and download our removal tool to have the virus expelled for good.
Step 1. Delete the following registry entries:
HKEY_CURRENT_USER\Software\SystemPro\
Step 2. Delete the following files:
%ProgramFiles%\SystemPro\
%ProgramFiles%\SystemPro\SystemPro.exe
%Documents and Settings%\[UserName]\Application Data\SystemPro\
%Documents and Settings%\[UserName]\Application Data\SystemPro\activate_hdr_2.png
%Documents and Settings%\[UserName]\Application Data\SystemPro\activate_hdr_bg.png
%Documents and Settings%\[UserName]\Application Data\SystemPro\at.png
%Documents and Settings%\[UserName]\Application Data\SystemPro\balloon_174.png
%Documents and Settings%\[UserName]\Application Data\SystemPro\balloon_201.png
%Documents and Settings%\[UserName]\Application Data\SystemPro\bg_button_a.png
%Documents and Settings%\[UserName]\Application Data\SystemPro\bg_button_span.png
%Documents and Settings%\[UserName]\Application Data\SystemPro\blank.gif
%Documents and Settings%\[UserName]\Application Data\SystemPro\block_p_01.png
%Documents and Settings%\[UserName]\Application Data\SystemPro\block_p_03.png
%Documents and Settings%\[UserName]\Application Data\SystemPro\blue.png
%Documents and Settings%\[UserName]\Application Data\SystemPro\critical_202.png
%Documents and Settings%\[UserName]\Application Data\SystemPro\filder.png
%Documents and Settings%\[UserName]\Application Data\SystemPro\i_1.png
%Documents and Settings%\[UserName]\Application Data\SystemPro\i_2.png
%Documents and Settings%\[UserName]\Application Data\SystemPro\i_3.png
%Documents and Settings%\[UserName]\Application Data\SystemPro\level.png
%Documents and Settings%\[UserName]\Application Data\SystemPro\loading.gif
%Documents and Settings%\[UserName]\Application Data\SystemPro\logo.png
%Documents and Settings%\[UserName]\Application Data\SystemPro\m.png
%Documents and Settings%\[UserName]\Application Data\SystemPro\off.png
%Documents and Settings%\[UserName]\Application Data\SystemPro\on.png
%Documents and Settings%\[UserName]\Application Data\SystemPro\pay.gif
%Documents and Settings%\[UserName]\Application Data\SystemPro\progressbar.gif
%Documents and Settings%\[UserName]\Application Data\SystemPro\progressbar_bg_1.gif
%Documents and Settings%\[UserName]\Application Data\SystemPro\prot.png
%Documents and Settings%\[UserName]\Application Data\SystemPro\scan_res_icon.png
%Documents and Settings%\[UserName]\Application Data\SystemPro\t01.png
%Documents and Settings%\[UserName]\Application Data\SystemPro\t02.png
%Documents and Settings%\[UserName]\Application Data\SystemPro\update.png
%Documents and Settings%\[UserName]\Application Data\SystemPro\w1.png
%Documents and Settings%\[UserName]\Application Data\SystemPro\w2.png
%Documents and Settings%\[UserName]\Application Data\SystemPro\w3.png
%Documents and Settings%\[UserName]\Application Data\SystemPro\w4.png
%Documents and Settings%\[UserName]\Application Data\SystemPro\w5.png
%Documents and Settings%\[UserName]\Application Data\SystemPro\warning_popup_072.png
%Documents and Settings%\[UserName]\Application Data\SystemPro\warning_popup_200.png
%Documents and Settings%\[UserName]\Application Data\SystemPro\windows_defender_gradient.png
%Documents and Settings%\[UserName]\Application Data\SystemPro\windows_defender_shield.png
%Documents and Settings%\[UserName]\Application Data\SystemPro\_001.png
%Documents and Settings%\[UserName]\Application Data\SystemPro\_002.png
%Documents and Settings%\[UserName]\Application Data\SystemPro\_005.png
%Documents and Settings%\[UserName]\Application Data\SystemPro\_006.png
%Documents and Settings%\[UserName]\Application Data\SystemPro\_007.png
%Documents and Settings%\[UserName]\Application Data\SystemPro\_ico1.png
%Documents and Settings%\[UserName]\Application Data\SystemPro\_ico2.png
%Documents and Settings%\[UserName]\Application Data\SystemPro\_ico3.png
%Documents and Settings%\[UserName]\Application Data\SystemPro\activate_01.png
%Documents and Settings%\[UserName]\Application Data\SystemPro\activate_02.png
%Documents and Settings%\[UserName]\Application Data\SystemPro\activate_03.png
%Documents and Settings%\[UserName]\Application Data\SystemPro\activate_hdr_1.png
%Documents and Settings%\[UserName]\Application Data\Uninstall_Security\
%Documents and Settings%\[UserName]\Application Data\Uninstall_Security\uninstall_security.lnk
%Documents and Settings%\[UserName]\Start Menu\Programs\Startup\SystemPro.lnk
%Documents and Settings%\[UserName]\Start Menu\Programs\SystemPro\
%Documents and Settings%\[UserName]\Start Menu\Programs\SystemPro\SystemPro.lnk
Please, be aware that manual removal of System Pro 2011 virus is a cumbersome task and can not always ensure complete removal of the malware, due to the fact that some files might be hidden or may get reanimated automatically afterwards. Moreover, manual interference of this kind may cause damage to the system. That’s why it’s strongly recommended automatic removal of System Pro 2011 virus, which will save your time and enable avoiding any system malfunctions and guarantee the needed result.
Automatic System Pro 2011 virus Removal:
1. Restart your computer and keep pressing F8 Key before Windows launches. Use the arrow keys to select the “Safe Mode with Networking” option, and then hit ENTER Key to continue.
2. Download System Pro 2011 Virus Remover, install it and update its database to the latest. After that, restart your computer so as to make System Pro 2011 Virus Remover fully functional. Repeat Step 1 into Safe Mode and run an Online Scan of your computer so that System Pro 2011 Virus Remover can detect all potential malware in your system.
NOTE: If you have problem installing System Pro 2011 Virus Remover, you can download this correction script, unzip it and then double click to run it. It will correct your registry settings that the virus has modified. Then double click the program and finish the installation.
3. After the Online Scan finishes, click “Details” for the malware detected to make sure that your important data are not infected and removed. Ignore or select the scan result and click “Remove” to remove the threats. Reboot your computer and let System Pro 2011 Virus Remover delete all detected virus.
4. Click to repair your corrupted registry
Why should you need to repair the registry?
As we all know, virus and Trojans modify and destroy system registry and make the computer malfunction so that the computer will not perform normally. Even if the virus and Trojans are removed, the registry is still destroyed or modified, so the computer still has problems. That’s the very reason why you need to repair the registry. At the meanwhile, some virus and Trojans leave some DLL files in the registry and this will cause strange DLL errors and affect the computer performance.
To make your computer run as perfectly as before or much faster than before:
1. Download and install Multi-Awarded Registry Tool.
2. Run a full scan of your registry.
3. Click “Repair Problems” and repair all errors detected.
After these 3 easy steps, your computer will run much faster than before within minutes!


Related posts:
Step by Step Uninstall/remove PC Security 2011 Virus Guide | Security-Wire.com on January 8th, 2011
[…] Security 2011 is a rogue anti-spyware whose forerunners are System Pro 2011 or Win7 AV. PC Security 2011 usually intrudes into your workstation with the help of Trojan viruses […]